Monday, October 20, 2008
Midnight Club: Los Angeles
Tomorrow is the day. Midnight Club Los Angeles will launch tomorrow. This is the third game I worked on for Rockstar. If you are into racing games you need to check it out :-)
Thursday, October 16, 2008
Hardware GPU / SPU / CPU
I follow all the discussions about the future of game hardware with talks about Larrabee and GPUs and the death of 3D APIs and -depending on the view point- different hardware designs.
The thing I figure is that all this is quite interesting and inspiring but our cycles of change in computer graphics and graphics programming are pretty long. Most of the stuff we do is based on research papers that were released more than 30 years ago and written on typewriters.
Why should any new piece of hardware change all this in a very short amount of time?
There is a game market out there that grows in double digit percentage numbers on all kind of hardware. How much of this market and its growth would be influenced by any new hardware?
Some of the best distributed game hardware is pretty old and following most standards, sub-performant. Nevertheless it offers entertainment that people enjoy.
So how important is it if we program a CPU/SPU/GPU or whatever we call the next thing. Give me a washing machine with a display and I make an entertainment machine with robo rumble out of it.
Thursday, October 2, 2008
S3 Graphics Chrome 440 GTX
I bought a new S3 Chrome 440 GTX in the S3 online store. I wanted to know how this card is doing, especially because it is DirectX 10.1 compatible. The other reason why I bought it was that it has a HDMI output. Just putting it into my desktop machine was interesting. I removed a 8800 GTS which was really heavy and than this card that was so small and didn't even need an extra power supply. It looks like some of my graphics cards from the end of the 90th when they started to put fans on the cards. With the small fan it should be possible to passively cool that card easily.
I just went through the DirectX 10 SDK examples. Motion Blur is about 5.8 fps and NBodyGravity is about 1.8 fps. The instancing example runs with 11.90 fps. I use the VISTA 64-bit beta drivers 7.15.12.0217-18.05.03. The other examples run fast enough. The CPU does not seem to become overly busy.
Just saw that there is a newer driver. The latest driver which is WHQL'ed has the version number 248. The motion blur example runs with 6.3 fps with some artefacts (the beta driver had that as well), Instancing ran with 11.77 fps and the NBodyGravity example with 1.83 fps ... probably not an accurate way to measure this stuff at all but at least it gives a rough idea.
The integrated INTEL chip 4500 MHD in my notebook is slower than this but then it supports at least DX10 and the notebook is super light :-) ... for development it just depends for me on the feature support (Most of the time I prototype effects on PCs).
While playing around with the two chipsets I just found out that the mobile INTEL chip also runs the new DirectX 10.1 SDK example Depth of Field with more than 20 fps. This is quite impressive. The Chrome 440 GTX is running this example with more than 100 fps. The new Raycast Terrain example runs with 19.6 fps on the Chrome and with less 7.6 fps on the Mobile INTEL chip set. The example that is not running on the Mobile INTEL chip is the ProceduralMaterial example. It runs with less than 1 fps on the Chrome 440 GTX.
Nevertheless it seems like both companies did their homework with the DirectX SDK.
So I just ran a bunch of ShaderX7 example programs against the cards. While the INTEL Mobile chip shows errors in some of the DirectX9 examples and crashes in some of the DirectX 10 stuff, the Chrome seems to even take the DirectX 10.1 examples that I have, that usually only run on ATI hardware ... nice!
One thing that I haven't thought of is GLSL support. I thought that only ATI and NVIDIA have GLSL support but S3 seems to have it as well. INTEL's mobile chip does not have it so ...
I will try out the 3D Futuremark Vantage Benchmark. It seems a Chrome 400 Series is in there with a score of 222. Probably not too bad considering the fact that they probably not pay Futuremark for being a member of their program.
Update October 4th: the S3 Chrome 440 GTX did 340 as the Graphics score in the trial version of the 3D Mark Vantage.
Wednesday, October 1, 2008
Old Interview
Just bumped into an old interview I gave to Gamedev.net. I still think everything in there is valid
While reading it I thought it is kind of boring. Many of my answers are so obvious ... maybe this is just my perception. How can you make it into the game industry? Probably on the same way you can make it into any industry. Lots of education or luck or just being at the right time at the right place and then being creative, a good thinker etc.. There is no magic trick I think ... it all comes with lots of sweat.
Tuesday, September 30, 2008
64-bit VISTA Tricks
I got a new notebook today with 64-bit VISTA pre-installed. It will replace a Desktop that had 64-bit VISTA on there. My friend Andy Firth provided me with the following tricks to make my life easier (it has a 64 GB solid state in there, so no hard-drive optimizations):
Switch Off User Account Control
This gets rid of the on-going "are you sure" questions.
Go to Control Panel. Click on User Account and switch it off.
Disable Superfetch
Press Windows key + R. Start services.msc and scroll down until you find Superfetch. Double click on it and change the startup type to Disabled.
Sunday, September 28, 2008
Light Pre-Pass: More Blood
I spent some more time with the Light Pre-Pass renderer. Here are my assumptions:
N.H^n = (N.L * N.H^n * Att) / (N.L * Att)
This division happens in the forward rendering path. The light source has its own shininess value in there == the power n value. With the specular component extracted, I can apply the material shininess value like this.
(N.H^n)^nm
Then I can re-construct the Blinn-Phong lighting equation. The data stored in the Light Buffer is treated like one light source. As a reminder, the first three channels of the light buffer hold:
N.L * Att * DiffuseColor
Color = Ambient + (LightBuffer.rgb * MatDiffInt) + MatSpecInt * (N.H^n)^mn * N.L * Att
So how could I do this :-)
N.H^n = (N.L * N.H^n * Att) / (N.L * Att)
N.L * Att is not in any channel of the Light buffer. How can I get this? The trick here is to convert the first three channels of the Light Buffer to luminance. The value should be pretty close to N.L * Att.
This also opens up a bunch of ideas for different materials. Every time you need the N.L * Att term you replace it with luminance. This should give you a wide range of materials.
The results I get are very exciting. Here is a list of advantages over a Deferred Renderer:
- less cost per light (you calculate much less in the Light pass)
- easier MSAA
- more material variety
- less read memory bandwidth -> fetches only two instead of the four textures it takes in a Deferred Renderer
- runs on hardware without ps_3_0 and MRT -> runs on DX8.1 hardware
N.H^n = (N.L * N.H^n * Att) / (N.L * Att)
This division happens in the forward rendering path. The light source has its own shininess value in there == the power n value. With the specular component extracted, I can apply the material shininess value like this.
(N.H^n)^nm
Then I can re-construct the Blinn-Phong lighting equation. The data stored in the Light Buffer is treated like one light source. As a reminder, the first three channels of the light buffer hold:
N.L * Att * DiffuseColor
Color = Ambient + (LightBuffer.rgb * MatDiffInt) + MatSpecInt * (N.H^n)^mn * N.L * Att
So how could I do this :-)
N.H^n = (N.L * N.H^n * Att) / (N.L * Att)
N.L * Att is not in any channel of the Light buffer. How can I get this? The trick here is to convert the first three channels of the Light Buffer to luminance. The value should be pretty close to N.L * Att.
This also opens up a bunch of ideas for different materials. Every time you need the N.L * Att term you replace it with luminance. This should give you a wide range of materials.
The results I get are very exciting. Here is a list of advantages over a Deferred Renderer:
- less cost per light (you calculate much less in the Light pass)
- easier MSAA
- more material variety
- less read memory bandwidth -> fetches only two instead of the four textures it takes in a Deferred Renderer
- runs on hardware without ps_3_0 and MRT -> runs on DX8.1 hardware
Sunday, September 21, 2008
Shader Workflow - Why Shader Generators are Bad
[quote]As far as I can tell from this discussion, no one has really proposed an alternative to shader permutations, merely they've been proposing ways of managing those permutations.[/quote]
If you define shader permutations as having lots of small differences but using the same code than you have to live with the fact that whatever is send to the hardware is a full-blown shader, even if you have exactly the same skinning code in every other shader.
So the end result is always the same ... whatever you do on the level above that.
What I describe is a practical approach to handle shaders with a high amount of material variety and a good workflow.
Shaders are some of the most expensive assets in production value and time spend of the programming team. They need to be the highest optimized piece of code we have, because it is much harder to squeeze out performance from a GPU than from a CPU.
Shader generators or a material editor (.. or however you call it) are not an appropriate way to generate or handle shaders because they are hard to maintain, offer not enough material variety and are not very efficient because it is hard to hand optimize code that is generated on the fly.
This is why developers do not use them and do not want to use them. It is possible that they play a role in indie or non-profit development so because those teams are money and time constraint and do not have to compete in the AAA sector.
In general the basic mistake people make that think that ueber-shaders or material editors or shader generators would make sense is that they do not understand how to program a graphics card. They assume it would be similar to programming a CPU and therefore think they could generate code for those cards.
It would make more sense to generate code on the fly for CPUs (... which also happens in the graphics card drivers) and at other places (real-time assemblers) than for GPUs because GPUs do not have anything close to linear performance behaviours. The difference between a performance hotspot and a point where you made something wrong can be 1:1000 in time (following a presentation from Matthias Wloka). You hand optimize shaders to hit those hotspots and the way you do it is that you analyze the results provided by PIX and other tools to find out where the performance hotspot of the shader is.
Thursday, September 18, 2008
ARM VFP ASM development
Following Matthias Grundmann's invitation to join forces I setup a Google code repository for this:
here
The idea is to have a math library that is optimized for the VFP unit of an ARM processor. This should be useful on the iPhone / iPod touch.
here
The idea is to have a math library that is optimized for the VFP unit of an ARM processor. This should be useful on the iPhone / iPod touch.
Friday, September 12, 2008
More Mobile Development
Now that I had so much fun with the iPhone I am thinking about new challenges in the mobile phone development area. The Touch HD looks like a cool target. It has a DX8-class ATI graphics card in there. Probably on par with the iPhone graphics card and you can program it in C/C++ which is important for the performance.
Depending on how easy it will be to get Oolong running on this I will extend Oolong to support this platform as well.
Depending on how easy it will be to get Oolong running on this I will extend Oolong to support this platform as well.
Wednesday, September 10, 2008
Shader Workflow
I just posted a forum message about what I consider an ideal shader workflow in a team. I thought I share it here:
Setting up a good shader workflow is easy. You just setup a folder that is called shaderlib, then you setup a folder that is called shader. In shaderlib there are files like lighting.fxh, utility.fxh, normals.fxh, skinning.fxh etc. and in the directory shader there are files like metal.fx, skin.fx, stone.fx, eyelashes.fx, eyes.fx. In each of those *.fx files there is a technique for whatever special state you need. You might have in there techniques like lit, depthwrite etc..
All the "intelligence" is in the shaderlib directory in the *.fxh files. The fx files just stitch together function calls. The HLSL compiler resolves those function calls by inlining the code.
So it is easy to just send someone the shaderlib directory with all the files in there and share your shader code this way.
In the lighting.fxh include file you will have all kinds of lighting models like Ashikhmin-Shirley, Cook-Torrance or Oren-Nayar and obviously Blinn-Phong or just a different BRDF that can mimic a certain material especially good. In normals.fxh you have routines that can fetch normals in different ways and unpack them. Obviously all the DXT5 and DXT1 tricks are in there but also routines that let you fetch height data to generate normals from it. In utility.fxh you have support for different color spaces, special optimizations for different platforms, like special texture fetches etc. In skinning.fxh you have all code related to skinning and animation ... etc.
If you give this library to a graphics programmer he obviously has to put together the shader on his own but he can start looking at what is requested and use different approaches to see what fits best for the job. He does not have to come up with ways on how to generate a normal from height or color data or how to deal with different color spaces.
For a good, efficient and high quality workflow in a game team, this is what you want.
Tuesday, September 9, 2008
Calculating Screen-Space Texture Coordinates for the 2D Projection of a Volume
Calculating screen space texture coordinates for the 2D projection of a volume is more complicated than for an already transformed full-screen quad. Here is a step-by-step approach on how to achieve this:
1. Transforming position into projection space is done in the vertex shader by multiplying the concatenated World-View-Projection matrix.
2. The Direct3D run-time will now divide those values by Z; stored in the W component. The resulting position is then considered in clipping space, where the x and y value is clipped to the [-1.0, 1.0] range.
xclip = xproj / wproj
yclip = yproj / wproj
3. Then the Direct3D run-time transforms position into viewport space from the value range [-1.0, 1.0] to the range [0.0, ScreenWidth/ScreenHeight].
xviewport = xclipspace * ScreenWidth / 2 + ScreenWidth / 2
yviewport = -yclipspace * ScreenHeight / 2 + ScreenHeight / 2
This can be simplified to:
xviewport = (xclipspace + 1.0) * ScreenWidth / 2
yviewport = (1.0 - yclipspace ) * ScreenHeight / 2
The result represents the position on the screen. The y component need to be inverted because in world / view / projection space it increases in the opposite direction than in screen coordinates.
4. Because the result should be in texture space and not in screen space, the coordinates need to be transformed from clipping space to texture space. In other words from the range [-1.0, 1.0] to the range [0.0, 1.0].
u = (xclipspace + 1.0) * 1 / 2
v = (1.0 - yclipspace ) * 1 / 2
5. Due to the texturing algorithm used by Direct3D, we need to adjust texture coordinates by half a texel:
u = (xclipspace + 1.0) * ½ + ½ * TargetWidth
v = (1.0 - yclipspace ) * ½ + ½ * TargetHeight
Plugging in the x and y clipspace coordinates results from step 2:
u = (xproj / wproj + 1.0) * ½ + ½ * TargetWidth
v = (1.0 - yproj / wproj ) * ½ + ½ * TargetHeight
6. Because the final calculation of this equation should happen in the vertex shader results will be send down through the texture coordinate interpolator registers. Interpolating 1/ wproj is not the same as 1 / interpolated wproj. Therefore the term 1/ wproj needs to be extracted and applied in the pixel shader.
u = 1/ wproj * ((xproj + wproj) * ½ + ½ * TargetWidth * wproj)
v = 1/ wproj * ((wproj - yproj) * ½ + ½ * TargetHeight* wproj)
The vertex shader source code looks like this:
Float4 vPos = float4(0.5 * (float2(p.x + p.w, p.w – p.y) + p.w * inScreenDim.xy), pos.zw)
The equation without the half pixel offset would start at No. 4 like this:
u = (xclipspace + 1.0) * 1 / 2
v = (1.0 - yclipspace ) * 1 / 2
Plugging in the x and y clipspace coordinates results from step 2:
u = (xproj / wproj + 1.0) * ½
v = (1.0 - yproj / wproj ) * ½
Moving 1 / wproj to the front leads to:
u = 1/ wproj * ((xproj + wproj) * ½)
v = 1/ wproj * ((wproj - yproj) * ½)
Because the pixel shader is doing the 1 / wproj, this would lead to the following vertex shader code:
Float4 vPos = float4(0.5 * (float2(p.x + p.w, p.w – p.y)), pos.zw)
All this is based on a response of mikaelc in the following thread:
Lighting in a Deferred Renderer and a response by Frank Puig Placeres in the following thread:
Reconstructing Position from Depth Data
Sunday, September 7, 2008
Gauss Filter Kernel
Just found a good tutorial on how to setup a Gauss filter kernel here:
OpenGL Bloom Tutorial
The interesting part is that he shows a way on how to generate the offset values and he also mentions a trick that I use for a long time. He reduces the filter kernel size by utilizing the hardware linear filtering. So he can go down from 5 to 3 taps. I usually use bilinear filtering to go down from 9 to 4 taps or 25 to 16 taps (with non-separable filter kernels) ... you got the idea.
Eric Haines just reminded me of the fact that this is also described in ShaderX2 - Tips and Tricks on page 451. You can find the -now free- book at
http://www.gamedev.net/reference/programming/features/shaderx2/Tips_and_Tricks_with_DirectX_9.pdf
BTW: Eric Haines contacted all the authors of this book to get permission to make it "open source". I would like to thank him for this.
Check out his blog at
http://www.realtimerendering.com/blog/
Monday, August 18, 2008
Beyond Programmable Shading
I was on SIGGRAPH to attend the "Beyond Programmable Shading" day. I spent the whole morning there and left during the last talk in the morning.
Here is the URL for the Larrabee day:
http://s08.idav.ucdavis.edu/
The talks are quite inspiring. I was hoping to see actual Larrabee hardware in action but they did not have any.
I liked Chas Boyd's DirectX 11 talk because he made it clear that there are different software designs for different applications and having looked into DirectX 11 now for a while it seems like there is a great API coming up soon that solves some of the outstanding issues we had with DirectX9 (DirectX 10 will be probably skipped by many in the industry).
The other thing that impressed me is AMD's CAL. The source code looks very elegant for the amount of performance you can unlock with it. Together with Brook+ it lets you control a huge number of cards. It seems like Cuda will be able to easier handle many GPUs at once soon too. PostFX are a good candidate for those APIs. CAL and CUDA can live in harmony with DirectX9/10 and DirectX 11 will even have a compute shader model that is the equivalent to CAL and CUDA. Compute shaders are written in HLSL … so a consistent environment.
Thursday, July 31, 2008
ARM Assembly
So I decided to increase my relationship to iPhone programming a bit and bought an ARM assembly book to learn how to program ARM assembly. The target is to figure out how to program the MMX like instruction set that comes with the processor. Then I would create a vectorized math library ... let's see how this goes.
Tuesday, July 29, 2008
PostFX - The Nx-Gen Approach
More than three years ago I wrote a PostFX pipeline (with a large number of effects) that I constantly improved up until the beginning of last year (www.coretechniques.info .. look for the outline of algorithms in the PostFX talk from 2007). Now it shipped in a couple of games. So what is nx-gen here?
On my main target platforms (360 and PS3) it will be hard to squeeze out more performance. There is probably lots of room in everything related to HDR but overall I wouldn't expect any fundamental changes. The main challenge with the pipeline was not on a technical level, but to explain to the artists how they can use it. Especially the tone mapping functionality was hard to explain and it was also hard to give them a starting point where they can work from.
So I am thinking about making it easier for the artists to use this pipeline. The main idea is to follow the camera paradigm. Most of the effects (HDR, Depth of Field, Motion Blur, color filters) of the pipeline are expected to mimic a real-world camera so why not make it use like a real-world camera?
The idea is to only expose functionality that is usually exposed by a camera and name all the sliders accordingly. Furthermore there will be different camera models with different basic properties as a starting point for the artists. It should also be possible to just switch between those on the fly. So a whole group of properties changes on the flip of a switch. This should make it easier to use cameras for cut scenes etc.
iPhone development - Oolong Engine
Just read that John Carmack likes the iPhone as a dev platform. That reminds me of the fact how I started my iPhone engine Oolong Engine in September 2007. Initially I wanted to do some development for the Dreamcast. I got a Dreamcast devkit, a CD burner and all the manuals from friends to start with this. My idea behind all this was to do graphics demos on this platform because I was looking for a new challenge. When I had all the pieces together to start my Dreamcast graphics demo career, a friend told me the specs of the iPhone ... and it became obvious that this would be even a better target :-) ... at the time everyone assumed that Apple will never allow to program for this platform. This was exactly what I was looking for. What can be better than a restricted platform that can't be used by everyone that I can even take with me and show it to the geekiest of my friends :-)
With some intial help from a friend (thank you Andrew :-)) I wrote the initial version of the Oolong engine and had lots of fun figuring out what is possible on the platform and what not. Then at some point Steve Jobs surprised us with the announcement that there will be an SDK and judging from Apple's history I was believing that they probably won't allow to develop games for the platform.
So now that we have an official SDK I am surprised how my initial small scale geek project turned out :-) ... suddenly I am the maintainer of a small little engine that is used in several productions.
Light Pre-Pass - First Blood :-)
I was looking for a simple way to deal with different specular values coming from different materials. It seems that one of the most obvious ways is the most efficient way to deal with this. If you are used to start with a math equation first -as I do- it is not easy to see this solution.
To recap: what ends up in the four channels of the light buffer for a point light is the following:
Diffuse.r * N.L * Att | Diffuse.g * N.L * Att | Diffuse.b * N.L * Att | N.H^n * N.L * Att
So n represents the shininess value of the light source. My original idea to apply now different specular values in the forward rendering pass later was to divide by N.L * Att like this:
(N.H^n * N.L * Att) \ (N.L * Att)
This way I would have re-constructed the N.H^n term and I could easily do something like this:
(N.H^n)^mn
where mn represents the material specular. Unfortunately this requires to store the N.L * Att term in a separate render target channel. The more obvious way to deal with it is to just do this:
(N.H^n * N.L * Att)^mn
... maybe not quite right but it looks good enough for what I would want to achieve.
Friday, June 13, 2008
Stable Cascaded Shadow Maps
I really like Michal Valient's article "Stable Cascaded Shadow Maps". It is a very practical approach to make Cascaded Shadow Maps more stable.
What I also like about it is the ShaderX idea. I wrote an article in ShaderX5 describing a first implementation (.... btw. I re-wrote that three times since than), Michal picks up from there and brings it to the next level.
There will be now a ShaderX7 article in which I will describe a slight improvement to Michal's approach. Michal picks the right shadow map with a rather cool trick. Mine is a bit different but it might be more efficient. So what I do to pick the right map is send down the sphere that is constructed for the light view frustum. I then check if the pixel is in the sphere. If it is I pick that shadow map, if it isn't I go to the next sphere. I also early out if it is not in a sphere by returning white.
At first sight it does not look like a trick but if you think about the spheres lined up along the view frustum and the way they intersect, it is actually pretty efficient and fast.
On my target platforms, especially on the one that Michal likes a lot, this makes a difference.
Thursday, June 12, 2008
Screen-Space Global Illumination
I am thinking a lot about Crytek's Screen-Space Ambient Occlusion (SSAO) and the idea of extending this into a global illumination term.
When combined with a Light Pre-Pass renderer, there is the light buffer with all the N.L * Att values that can be used as intensity and then there is the end-result of opaque rendering pass and we have a normal map lying around. Doing the light bounce along the normal and using the N.L*Att entry in the light buffer as intensity should do the trick. The way the values are fetched would be similar to SSAO.
When combined with a Light Pre-Pass renderer, there is the light buffer with all the N.L * Att values that can be used as intensity and then there is the end-result of opaque rendering pass and we have a normal map lying around. Doing the light bounce along the normal and using the N.L*Att entry in the light buffer as intensity should do the trick. The way the values are fetched would be similar to SSAO.
Wednesday, May 28, 2008
UCSD Talk on Light Pre-Pass Renderer
So the Light Pre-Pass renderer had its first public performance :-) ... I talked yesterday at UCSD about this new renderer design. There will be a ShaderX7 article as well.
Pat Wilson from Garagegames is sharing his findings with me. He came up with an interesting way to store LUV colors.
Renaldas Zioma told me that a similar idea was used in Battlezone 2.
This is exciting :-)
The link to the slides is at the end of the March 16th post.
Pat Wilson from Garagegames is sharing his findings with me. He came up with an interesting way to store LUV colors.
Renaldas Zioma told me that a similar idea was used in Battlezone 2.
This is exciting :-)
The link to the slides is at the end of the March 16th post.
Thursday, May 15, 2008
DX 10 Graphics demo skeleton
I setup a google code website with one of my small little side projects that I worked on more than a year ago. To compete in graphics demo competitions you need a very small exe. I wanted to figure out how to do this with DX10 and this is the result :-) ... follow the link
http://code.google.com/p/graphicsdemoskeleton/
What is it: it is just a minimum skeleton to start creating your own small-size apps with DX10. At some point I had a particle system running in 1.5kb this way (that was with DX9). If you think about the concept of small exes there is one interesting thing I figured out. When I use DX9 and I compile HLSL shader code to a header file and include it to use it, it is smaller than the equivalent C code. So what I was thinking was: hey let's write a math library in HLSL and use the CPU only with the stub code to launch everything and let it run on the GPU :-)
Tuesday, April 29, 2008
Today is the day: GTA IV is released
I am really excited about this. This is the second game I worked on for Rockstar and it is finally coming out ...
Monday, April 21, 2008
RGB -> XYZ conversion
Here is the official way to do it:
http://www.w3.org/Graphics/Color/sRGB
They use
// 0.4125 0.3576 0.1805
// 0.2126 0.7152 0.0722
// 0.0193 0.1192 0.9505
to convert from RGB to XYZ and
// 3.2410 -1.5374 -0.4986
// -0.9692 1.8760 0.0416
// 0.0556 -0.2040 1.0570
to convert back.
Here is how I do it:
const FLOAT3x3 RGB2XYZ = {0.5141364, 0.3238786, 0.16036376,
0.265068, 0.67023428, 0.06409157,
0.0241188, 0.1228178, 0.84442666};
Here is how I convert back:
const float3x3 XYZ2RGB = { 2.5651,-1.1665,-0.3986,
-1.0217, 1.9777, 0.0439,
0.0753, -0.2543, 1.1892};
You should definitely try out different ways to do this :-)
Monday, April 14, 2008
Ported my iPhone Engine to OS 2.0
I spend three days last week to port the Oolong engine over to the latest iPhone / iPod touch OS.
http://www.oolongengine.com
My main development device is still a iPod touch because I am worried about not being able to make phone calls anymore.
http://www.oolongengine.com
My main development device is still a iPod touch because I am worried about not being able to make phone calls anymore.
Tuesday, April 8, 2008
Accepted for the iPhone Developer Program
Whooo I am finally accepted! I have access to the iPhone developer program. Now I can start to port my Oolong Engine over :-)
Tuesday, March 25, 2008
Some Great Links
I just came accross some cool links today while looking for material that shows multi-core programming and how to generate an indexed triangle list from a triangle soup.
I did not know that you can setup a virtual Cell chip on your PC. This course looks interesting:
http://www.cc.gatech.edu/~bader/CellProgramming.html
John Ratcliff's Code Suppository is a great place to find fantastic code snippets:
http://www.codesuppository.blogspot.com/
Here is a great paper to help with first steps in multi-core programming:
http://www.digra.org/dl/db/06278.34239.pdf
A general graphics programming course is available here:
http://users.ece.gatech.edu/~lanterma/mpg/
I will provide this URL to people who ask me about how to learn graphics programming.
Sunday, March 16, 2008
Light Pre-Pass Renderer
In June last year I had an idea for a new rendering design. I call it light pre-pass renderer.
The idea is to fill up a Z buffer first and also store normals in a render target. This is like a G-Buffer with normals and Z values ... so compared to a deferred renderer there is no diffuse color, specular color, material index or position data stored in this stage.
Next the light buffer is filled up with light properties. So the idea is to differ between light and material properties. If you look at a simplified light equation for one point light it looks like this:
Color = Ambient + Shadow * Att * (N.L * DiffColor * DiffIntensity * LightColor + R.V^n * SpecColor * SpecIntensity * LightColor)
The light properties are:
- N.L
- LightColor
- R.V^n
- Attenuation
So what you can do is instead of rendering a whole lighting equation for each light into a render target, you render into a 8:8:8:8 render target only the light properties. You have four channels so you can render:
LightColor.r * N.L * Att
LightColor.g * N.L * Att
LightColor.b * N.L * Att
R.V^n * N.L * Att
That means in this setup there is no dedicated specular color ... which is on purpose (you can extend it easily).
Here is the source code what I store in the light buffer.
half4 ps_main( PS_INPUT Input ) : COLOR
{
half4 G_Buffer = tex2D( G_Buffer, Input.texCoord );
// Compute pixel position
half Depth = UnpackFloat16( G_Buffer.zw );
float3 PixelPos = normalize(Input.EyeScreenRay.xyz) * Depth;
// Compute normal
half3 Normal;
Normal.xy = G_Buffer.xy*2-1;
Normal.z = -sqrt(1-dot(Normal.xy,Normal.xy));
// Computes light attenuation and direction
float3 LightDir = (Input.LightPos - PixelPos)*InvSqrLightRange;
half Attenuation = saturate(1-dot(LightDir / LightAttenuation_0, LightDir / LightAttenuation_0));
LightDir = normalize(LightDir);
// R.V == Phong
float specular = pow(saturate(dot(reflect(normalize(-float3(0.0, 1.0, 0.0)), Normal), LightDir)), SpecularPower_0);
float NL = dot(LightDir, Normal)*Attenuation;
return float4(DiffuseLightColor_0.x*NL, DiffuseLightColor_0.y*NL, DiffuseLightColor_0.z*NL, specular * NL);
}
After all lights are alpha-blended into the light buffer, you switch to forward rendering and reconstruct the lighting equation. In its simplest form this might look like this
float4 ps_main( PS_INPUT Input ) : COLOR0
{
float4 Light = tex2D( Light_Buffer, Input.texCoord );
float3 NLATTColor = float3(Light.x, Light.y, Light.z);
float3 Lighting = NLATTColor + Light.www;
return float4(Lighting, 1.0f);
}
This is a direct competitor to the light indexed renderer idea described by Damian Trebilco at Paper .
I have a small example program that compares this approach to a deferred renderer but I have not compared it to Damian's approach. I believe his approach might be more flexible regarding a material system than mine but the Light Pre-Pass renderer does not need to do the indexing. It should even run on a seven year old ATI RADEON 8500 because you only have to do a Z pre-pass and store the normals upfront.
The following screenshot shows four point-lights. There is no restriction in the number of light sources:
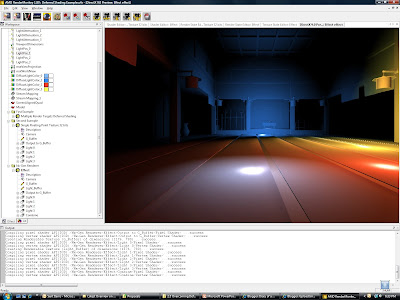 The following screenshots shows the same scene running with a deferred renderer. There should not be any visual differences to the Light Pre-Pass Renderer:
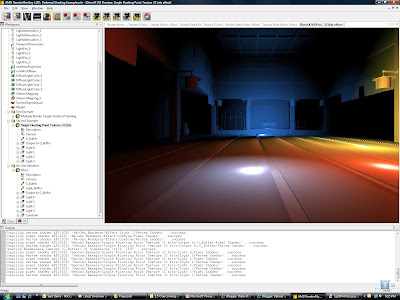
The design here is very flexible and scalable. So I expect people to start from here and end up with quite different results. One of the challenges with this approach is to setup a good material system. You can store different values in the light buffer or use the values above and construct interesting materials. For example a per-object specular highlight would be done by taking the value stored in the alpha channel and apply a power function to it or you store the power value in a different channel.
Obviously my intial approach is only scratching the surface of the possibilities.
P.S: to implement a material system for this you can do two things: you can handle it like in a deferred renderer by storing a material id with the normal map ... maybe in the alpha channel, or you can reconstruct the diffuse and specular term in the forward rendering pass. The only thing you have to store to do this is N.L * Att in a separate channel. This way you can get back R.V^n by using the specular channel and dividing it by N.L * Att. So what you do is:
(R.V^n * N.L * Att) / (N.L * Att)
Those are actually values that represent all light sources.
Here is a link to the slides of my UCSD Renderer Design presentation. They provide more detail.
The idea is to fill up a Z buffer first and also store normals in a render target. This is like a G-Buffer with normals and Z values ... so compared to a deferred renderer there is no diffuse color, specular color, material index or position data stored in this stage.
Next the light buffer is filled up with light properties. So the idea is to differ between light and material properties. If you look at a simplified light equation for one point light it looks like this:
Color = Ambient + Shadow * Att * (N.L * DiffColor * DiffIntensity * LightColor + R.V^n * SpecColor * SpecIntensity * LightColor)
The light properties are:
- N.L
- LightColor
- R.V^n
- Attenuation
So what you can do is instead of rendering a whole lighting equation for each light into a render target, you render into a 8:8:8:8 render target only the light properties. You have four channels so you can render:
LightColor.r * N.L * Att
LightColor.g * N.L * Att
LightColor.b * N.L * Att
R.V^n * N.L * Att
That means in this setup there is no dedicated specular color ... which is on purpose (you can extend it easily).
Here is the source code what I store in the light buffer.
half4 ps_main( PS_INPUT Input ) : COLOR
{
half4 G_Buffer = tex2D( G_Buffer, Input.texCoord );
// Compute pixel position
half Depth = UnpackFloat16( G_Buffer.zw );
float3 PixelPos = normalize(Input.EyeScreenRay.xyz) * Depth;
// Compute normal
half3 Normal;
Normal.xy = G_Buffer.xy*2-1;
Normal.z = -sqrt(1-dot(Normal.xy,Normal.xy));
// Computes light attenuation and direction
float3 LightDir = (Input.LightPos - PixelPos)*InvSqrLightRange;
half Attenuation = saturate(1-dot(LightDir / LightAttenuation_0, LightDir / LightAttenuation_0));
LightDir = normalize(LightDir);
// R.V == Phong
float specular = pow(saturate(dot(reflect(normalize(-float3(0.0, 1.0, 0.0)), Normal), LightDir)), SpecularPower_0);
float NL = dot(LightDir, Normal)*Attenuation;
return float4(DiffuseLightColor_0.x*NL, DiffuseLightColor_0.y*NL, DiffuseLightColor_0.z*NL, specular * NL);
}
After all lights are alpha-blended into the light buffer, you switch to forward rendering and reconstruct the lighting equation. In its simplest form this might look like this
float4 ps_main( PS_INPUT Input ) : COLOR0
{
float4 Light = tex2D( Light_Buffer, Input.texCoord );
float3 NLATTColor = float3(Light.x, Light.y, Light.z);
float3 Lighting = NLATTColor + Light.www;
return float4(Lighting, 1.0f);
}
This is a direct competitor to the light indexed renderer idea described by Damian Trebilco at Paper .
I have a small example program that compares this approach to a deferred renderer but I have not compared it to Damian's approach. I believe his approach might be more flexible regarding a material system than mine but the Light Pre-Pass renderer does not need to do the indexing. It should even run on a seven year old ATI RADEON 8500 because you only have to do a Z pre-pass and store the normals upfront.
The following screenshot shows four point-lights. There is no restriction in the number of light sources:
 The following screenshots shows the same scene running with a deferred renderer. There should not be any visual differences to the Light Pre-Pass Renderer:
The design here is very flexible and scalable. So I expect people to start from here and end up with quite different results. One of the challenges with this approach is to setup a good material system. You can store different values in the light buffer or use the values above and construct interesting materials. For example a per-object specular highlight would be done by taking the value stored in the alpha channel and apply a power function to it or you store the power value in a different channel.
Obviously my intial approach is only scratching the surface of the possibilities.
P.S: to implement a material system for this you can do two things: you can handle it like in a deferred renderer by storing a material id with the normal map ... maybe in the alpha channel, or you can reconstruct the diffuse and specular term in the forward rendering pass. The only thing you have to store to do this is N.L * Att in a separate channel. This way you can get back R.V^n by using the specular channel and dividing it by N.L * Att. So what you do is:
(R.V^n * N.L * Att) / (N.L * Att)
Those are actually values that represent all light sources.
Here is a link to the slides of my UCSD Renderer Design presentation. They provide more detail.
Friday, March 7, 2008
iPhone SDK so far
Just setup a dev environment this morning with the iPhone SDK ... overall it is quite disappointing for games :-). OpenGL ES is not supported in the emulator but you can't run apps on the iPhone without OS 2.0 ... and this is not realeased so far. In other words, they have OpenGL ES examples but you can't run them anywhere. I hope I get access to the 2.0 file system somehow. Other than this I have now the old and the new SDK setup on one machine and it works nicely.
Now I have to wait until I get access to the iPhone OS 2.0 ... what a pain.
Now I have to wait until I get access to the iPhone OS 2.0 ... what a pain.
Sunday, March 2, 2008
Predicting the Future in Game Graphics
So I was thinking about the next 1 - 2 years of graphics programming in the game industry on the XBOX 360 and the PS3. I think we can see a few very strong trends that will sustain over the next few years.
HDR
Rendering with high-dynamic range is realized in two areas: in the renderer and in the source data == textures of objects
On current high-end platforms people run the lighting in the renderer in gamma 1.0 and they are using the 10:10:10:2 format whereever available or a 8:8:8:8 render target format that uses a non-standard color format that supports a larger range of values (> 1) and more deltas. Typically these are the LogLuv or L16uv color formats.
There are big developements for the source art. id Software published an article on a 8-bit per pixel color format -stored in a DXT5 format- that has a much better quality than the DXT1 format with 4-bit per pixel that we usually use. Before that there were numerous attempts by using scale and bias values in the hacked DXT header to use the available deltas in the texture better for -e.g.- rather dark textures. One of the challenges here was to make all this work with gamma 1.0.
On GDC 2007 I suggested during Chas. Boyds DirectX Future talk to extend DX to support a HDR format with 8-bit that also supports gamma 1.0 better. It would be great if they could come up with a better compression scheme than DXT in the future but until then we will try to make combinations of DXT1 + L16 or DXT5 hacks scenarios work :-) or utilize id Software's solution.
Normal Map Data
Some of the most expensive data is normal map data. So far we are "mis-using" the DXT formats to compress vector data. If you generally store height data this opens up more options. Many future techniques like Parallax mapping or any "normal map blending" require height map data. So this is some area of practical interest :-) ... check out the normal vector talk of the GDC 2008 tutorial day I organized at http://www.coretechniques.info/.
Lighting Models
Everyone is trying to find lighting models that allow to mimic a wider range of materials. The Strauss lighting model seems to be popular and some people come up with their own lighting models.
Renderer Design
To render opaque objects there are currently two renderer designs on the end of the spectrum. The so called deferred renderer and the so called forward renderer. The idea of the deferred renderer design came up to allow a higher number of lights. The advantage of a higher number of lights has to be bought by having lower quality settings in other areas.
So people now start to research new renderer designs that have the advantages of both designs but none of the disadvantages. There is a Light indexed renderer and I am working on a Light pre-pass renderer. New renderer designs will allow more light sources ... but what is a light source without shadow? ...
Shadows
Lots of progress was made with shadows. Cascaded Shadow maps are now the favorite way to split up shadow data along the view frustum. Nevertheless there are more ways to distribute the shadow resolution. This is an interesting area of research.
The other big area is using probability functions to replace the binary depth comparison. Then the next big thing will be soft shadows that become softer when the distance between the occluder and the receiver becomes bigger.
Global Illumination
This is the area with the biggest growth potential currently in games :-) Like screen-space ambient occlusion that is super popular now because of Crysis, screen-space irradiance will offer lots of research opportunities.
To target more advanced hardware, Carsten Dachsbacher approach in ShaderX5 looks to me like a great starting point.
Wednesday, February 13, 2008
Android
Just read the FAQ for Android. Here is the most important part:
-----------------
Can I write code for Android using C/C++?
No. Android applications are written using the Java programming language.
-----------------
So no easy game ports for this platform. Additionally the language will eat up so many cycles that good looking 3D game do not make much sense. No business case for games then ... maybe they will start thinking about it :-) ... using Java also looks quite unprofessional to me but I heard other phone companies are doing this as well to protect their margin and keep control over the device.
-----------------
Can I write code for Android using C/C++?
No. Android applications are written using the Java programming language.
-----------------
So no easy game ports for this platform. Additionally the language will eat up so many cycles that good looking 3D game do not make much sense. No business case for games then ... maybe they will start thinking about it :-) ... using Java also looks quite unprofessional to me but I heard other phone companies are doing this as well to protect their margin and keep control over the device.
Friday, January 18, 2008
gDEbugger for OpenGL ES
So I decided to test the gDEbugger from graphicREMEDY for OpenGL ES. I got an error message indicating a second hand exception and there was not much I can do about it. I posted my problem in their online forum, but did not get any response so far.
I guess with the decreasing market of OpenGL there is not much money in providing a debugger for this API. In games, less companies do PC games anymore and OpenGL is not used by any AAA title anymore on the main PC platform Windows.
I was hoping that they target the upcoming OpenGL ES market, but this might be still in its infanty. If anyone knows a tool to debug OpenGL ES similar to PIX or GcmReplay, I would appreciate a hint. To debug I would work on the PC platform ... in other words I have a PC and an iPhone version of the game :-)
Update January 19th: graphicRemedy actually came back to me and asked me to send in source code ... very nice.
Tuesday, January 8, 2008
San Angeles Observation on the iPhone
I ported the San Angeles Observation demo from Jetro Lauha to the iPhone (www.oolongengine.com). You can find the original version here
http://iki.fi/jetro/
This demo throws about 60k polys onto the iPhone and runs quite slow :-(. I will double check with Apple that this is not due to a lame OpenGL ES implementation on the phone.
I am thinking about porting other stuff now over to the phone or working on getting a more mature feature set for the engine ... porting is nearly more fun, because you can show a result afterwards :-) ... let's see.
Sunday, December 30, 2007
Oolong Engine
I renamed my iPhone / iPod touch engine to Oolong Engine and moved it to a new home. Its URL is now
www.oolongengine.com
I will add now a 3rd person camera model. This camera will be driven by the accelerometer and the touch screen.
www.oolongengine.com
I will add now a 3rd person camera model. This camera will be driven by the accelerometer and the touch screen.
Wednesday, December 26, 2007
Animating Normal (Maps)
There seems to be an on-going confusion on how to animate normal maps. The best answer to this is: you don't :-).
The obvious problem is to stream in two normal maps and then to modulate two normals. If you are on a console platform you just don't want to do this. So what would be a good way to animate a normal? You modulate height fields. Where both height fields have peaks, the result should also have a peak. Where one of the height fields is zero, the result should be also be zero, independent of the other height field.
Usually, a normal map is formed by computing a relief of a height field (bump map) over a flat surface. If is the bump map’s height at the texture coordinates, the standard definition of the normal map is

The height fields are multiplied to form a combined height field like this

To determine the normal vector of this height field according to the first Equation, one needs the partial derivatives of this functions. This is a simple application of the product rule:

And similarly for the partial derivative with respect to v. Thus:
BTW: to recover the height field’s partial derivatives from the normal map we can use:
About Raytracing
My friend Dean Calver published an article about raytracing that is full of wisdom. The title says it all Real-Time Ray Tracing: Holy Grail or Fool's Errand?. This is straight to the point :-)
LogLuv HDR implementation in Heavenly Sword
Heavenly Sword stores HDR data in 8:8:8:8 render targets. I talked to Marco about this before and saw a nice description in Christer Ericson's blog here
I came up with a similar idea that should be faster and bit more hardware friendly with a new compression format that I call L16uv. The name more or less says it all :-)
I came up with a similar idea that should be faster and bit more hardware friendly with a new compression format that I call L16uv. The name more or less says it all :-)
Normal Map Data II
Here is one interesting normal data idea I missed. It is taken from Christer Ericson in his blog:
One clever thing they do (as mentioned on these two slides) is to encode their normal maps so that you can feed either a DXT1 or DXT5 encoded normal map to a shader, and the shader doesn’t have to know. This is neat because it cuts down on shader permutations for very little shader cost. Their trick is for DXT1 to encode X in R and Y in G, with alpha set to 1. For DXT5 they encode X in alpha, Y in G, and set R to 1. Then in the shader, regardless of texture encoding format, they reconstruct the normal as X = R * alpha, Y = G, Z = Sqrt(1 - X^2 - Y^2).
A DXT5-encoded normal map has much better quality than a DXT1-encoded one, because the alpha component of DXT5 is 8 bits whereas the red component of DXT1 is just 5 bits, but more so because the alpha component of a DXT5 texture is compressed independently from the RGB components (the three of which are compressed dependently for both DXT1 and DXT5) so with DXT5 we avoid co-compression artifacts. Of course, the cost is that the DXT5 texture takes twice the memory of a DXT1 texture (plus, on the PS3, DXT1 has some other benefits over DXT5 that I don’t think I can talk about).
Tuesday, December 25, 2007
Normal Data
Normal data is one of the more expensive assets of games. Creating normal data in Z Brush or mudbox can easily make up for a few million dollars.
Storing normal data in textures in a way that preserves the original data with the lowest error level is an art form that needs special attention.
I am now aware of three ways to destroy normal data by storing it in a texture:
1. Store the normal in a DXT1 compressed texture
2. Store the normal in a DXT5 compressed texture by storing the x value in alpha and the y value in the green channel .... and by storing some other color data in the red and blue channel.
3. Store the normal in its original form -as a height map- in one color channel of a DXT1 compressed texture with two other color channels.
They all have a common denominator: the DXT format was created to compress color data so that the resulting color is still perceived as similar. Perceiving 16 vectors as similar follows different rules than perceiving 16 colors as similar. Therefore the best -so far- solutions to store normals is to
- not compress them at all
- store y in the green channel of a DXT5 compressed texture and red in the alpha channel and color the two empty channels black
- use the DXN format that consists of two DXT5 compressed alpha channels
- store a height map in an alpha channel of a DXT5 compressed texture and generate the normal out of the height map.
The DXT5 solutions and the DXN solution occupy 8-bit per normal. The height map solution occupies 4-bit per normal. It is probably not as good looking as the 8-bit per normal solutions.
There are lots of interesting areas regarding normals other than how they are stored. There are challenges when you want to scale, add, modulate, deform, blend or filter them. Then there is also anti-aliasing ... :-) ... food for thought.
Wednesday, December 19, 2007
Renderer Design
Renderer design is an interesting area. I recommend starting with the lighting equation, splitting it up in a material and light part and then move on from there. You can then think about what data you need to do a huge number of direct lights and shadows (shadows are harder than lights) and how you do all the global illumination part. Especially the integration of global illumination and many lights should get you thinking for a while.
Here is an example:
1. render shadow data from the cascaded shadow maps into a shadow collector that collects indoor, outdoor, cloud shadow data
2. render at the same time world-space normals in the other three channels of the render target
3. render all lights into a light buffer (only the light source properties not the material properties)
4. render all colors and the material properties into a render target while applying all the lights from the light buffer (here you stitch together the Blinn-Phong lighting model or whatever you use)
5. do global illumination with the normal map
6. do PostFX
Tuesday, December 18, 2007
How to design a Material System
Here is my take on how a good meta-material / material systems should be written and how the art workflow works:
I just came across the latest screenshots of Mass Effect that will ship soon:
http://masseffect.bioware.com/gallery/
The thing I found remarkable is the material / meta-material system. Skin looks like skin and then cloth has a completely different look and leather looks really like leather. Combined with great normal maps Mass Effects looks like the game with the best looking characters up-to-date.
The best way to a material / meta-material system is very close to what was done in Table-Tennis. I described the system in ShaderX4 some time before I joined Rockstar.
The idea is to dedicate to each material a specific *.fx file and also name the file accordingly. So you end up with eye.fx, skin.fx, metal.fx, brushed_metal.fx, leather.fx, water.fx etc. ... so you will want to end up with probably 15 - 20 *.fx files (they would holds different techniques for shadowed / unshadowed etc.). This low number of files makes shader switching a non-issue and also allows to sort objects according to their shaders, if this is a bottleneck.
The *.fx files can be called meta-material (this naming convention was inspired by a similar system that was used in the Medal of Honor Games, as long as they were based on the Quake 3 engine).
The material files hold the data while each of the meta-material files only hold code. So we differ between code (*.fx file) and data (*.mtl or something different). One of the things that can be done to reduce the data updates is to shadow the constant data and only update the data that changes. In pseudo-code this would be:
- draw eyes from first character in the game
- apply the eye.fx file
- load the data for this file from the material file
- draw the eyes from the second character in the game
- eye.fx is still applied, so we do not have to do it again ... shader code just stays in the Graphics card and does not need to be reloaded
- load the data file for this pair of eyes and load only data into the graphics card that has changed by comparing the shadowed copy of the data from the previous draw call with the one that needs to be loaded now
- move on like this for all eyes
- then move on with hair ...
The underlying idea of the data shadowing and the sorting by shaders is, to reduce the amount of changes that need to be done if you want to apply very detailed and very different surfaces to a character. In other words if you setup a game with such a meta-material / material system there is a high chance that you can find a performance difference between sorting for shaders or sorting for any other criteria.
For me the key elements of having a truly next-gen looking shader architecture for a next-gen game are:
- having a low number of *.fx files to reduce shader switching + good sorting of objects to reduce shader switching
- letting the artist apply those *.fx files and change the settings, switching on and off features etc.
- tailoring the low number of shaders very much to specific materials, so that they look very good (the opposite approach was taken in DOOM III were everything consists of metal and plastic and therefore the same lighting/shader model is applied to everything)
The low number of *.fx files and the intelligence we put into the creation of the effect files should give us a well performing and good looking game and we are able to control this process and predict performance.
Sunday, December 9, 2007
Porting an Open-Source Engine to the iPhone?
Evaluated several open source engines:
- Ogre: the architecture and design is not very performance friendly. The usage of C++ makes the usage and re-design here quite difficult. An example: each material has its own C++ file and there is an inheritance chain from a base class ...
- Irrlicht: the Mac OS X version I tried looks like a Quake 3 engine. It also seems to lack lots of design elements of a modern 3D engine. Other than this it looks quite good for a portable device. You might also use the original Quake 3 engine then ...
- Quake 3: this is obviously a very efficient game engine with rock-solid tools, I worked with this engine in the Medal of Honor series before, but I wanted a bit more flexibility and I wanted to target more advanced hardware.
- Crystal Space: why is everything a plug-in? Can't get my head around this.
- C4: this is one of my favourite engines, but it is closed source :-(
Thursday, December 6, 2007
iPhone Graphics Programming
I am lately into iPhone graphics programming. The interesting part is that the iPhone uses a PowerVR chip similar to the Dreamcast. Most of the user interface elements want to be addressed via Objective-C but then you can go with C/C++ from there. So my small little engine runs C++ with a nice memory manager and a logging system.
Subscribe to:
Posts (Atom)